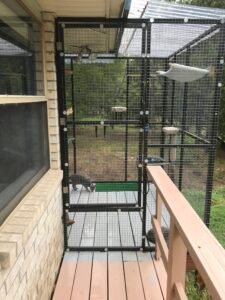
Lake View Catio Assembly

After welding the frame sections together, I applied a coat of primer and painted the frame black. Since we didn’t want to obstruct the view from the window, I used flat black enamel paint. It was easier to see through because it did not reflect much light. I drilled and bolted the frames together, and then fastened them to the wooden deck. Once the main frame was finished I installed the door. It was a foot above the deck floor because I didn’t want a cat trying run outside between my feet while opening it. It was only 5 feet tall and 2 feet wide. I placed a lockable latch on the door to avoid guests or grandkids opening the catio door without one of us around. It gave us extra peace of mind to know the cats could come and go from the catio and not escape. The area we lived in had coyotes, poisonous snakes, hawks, skunks, and occasional trespassing dogs. We had a friend that lost a small dog to a bobcat! Next, I measured and cut the roll of steel wire mesh to cover the frame in 2 foot and 3 foot sections vertically. Each square of wire mesh was about 7.5 feet tall, and fastened with galvanized machine screws. About every foot I pre-drilled an 1/8 inch hole with a high speed drill bit and screwed the wire mesh down on the frame with a 3/16 inch screw and ½ inch washer. I did not try to weld the wire to the frame because the wire mesh was galvanized, which creates a poisonous gas when heated with a welder. Plus, I had already primed and painted the frame.
Cats are amazing climbers and can contort themselves into small openings, so I covered the top with wire mesh, too. The mesh was made of 1 inch squares. I wanted ½ inch but couldn’t find it at a reasonable price. Some stores list the ¼ inch mesh as hardware cloth, but that was too small for our needs since we wanted to see through it easily. We decided that 1 inch would do so birds, rats, squirrels, and other pests could not easily get into the catio. The catio door had a strong steel spring placed at the top so it would close automatically. Some perches and steps were made from wood and carpet and placed in various locations so the cats could easily climb to the top. I knew the first thing they would want to do was find the high ground to survey the new surroundings in safety and comfort. The lake view catio was now ready to be tested by our two feline engineers.
Poppy and Angel loved the catio. Of course they climbed as high as they could so they would have a better view. I placed a hammock on one end and a large shelf in the middle corner. We cut some clear plastic green-house roof material to cover the top where the roof stopped and the catio continued so they could sit outside while it rained. The deck had about a ¼ inch space between the wooden planks so it was easy to wash down with a hose, yet they couldn’t get their paws through it. The electronic cat door allowed the cats to enter the catio from sun-up to sundown – we didn’t want them outside at night getting into trouble with other creatures or getting mosquito bites.

This was my first catio, and I enjoyed building it. It took about 2 weeks – perhaps 40 hours of effort to finish it. The total cost, including the electronic pet door, was almost $1,000 dollars. I estimate it would have cost over $3,000 to hire someone to build it.
We hope you have enjoyed the story. This hasn’t been meant to be a ‘How-To’ by any means but perhaps there are some steps and techniques I used that someone may find helpful if they plan to build a custom catio.
Next time, I’ll share my experience with building our current wood-framed catio.